Hi, it’s hmsmarim,
Today I will be talking about how I made a certain Holiday Craft. I made a bookmark with certain materials and I will talk about them later. I will tell you, step by step on how I made the bookmark. The materials and the step by step processes aren’t really hard to make or to get the materials.
Materials:
- Light card – white and patterned (or create your own patterns)
- Pencil and pens
- Paperclip
- Bakers Twine or yarn or string
- Tape & Glue Stick
Created by Me
Steps to make it:
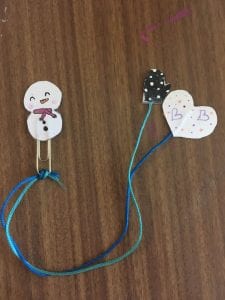
The Snowman
- Start off by sketching your snowman – you will need two ovals, a smaller one for the body – but wide enough to hold a strip of tape to secure the paper clip and a bigger one for the head. I love the proportion of the bigger head and smaller body – so kawaii!
- When you are happy with your design, cut out two snowman shapes the same size (for the simpler paper clip bookmark, you will only need 1)
- One on snowman – add our facial details (check ours for inspiration). On the second snowman – leave plain or add the back of the scarf!
- Tape your paper clip onto one of the snowman halves – make sure enough of the paper clip sticks out, so that it will fit over your book later.
- Glue your two snowman sides together.
- Hold in place with clothes pegs in need be.
The Mittens
7. Whilst the snowman dries, cut out 4 Mittens (I drew an oval, added a thumb and a little rectangular base). If you have a nice sheet paper like us, great.. if not, use a white sheet of paper/ card and color it!
8. Cut a length of baker’s twine – that is long enough to loop through your paper clip and fit the length of a book.
9. Loop around your paper clip.
10. Then glue between two mitten halves.